Pyrolysis Roasting Method


Pyrolysis roasting is a method of roasting coffee beans by heating them to induce chemical changes. It has the following characteristics compared to traditional roasting methods:

  1. Low-temperature roasting:

While conventional roasting methods take place at high temperatures above 180°C, pyrolysis roasting is conducted at a lower temperature of 100°C to 150°C.
Lower temperatures reduce smoke emissions, decrease bitterness and acidity, and emphasize fruit and floral aromas.

  1. Long roasting time:

Due to the use of lower temperatures, the roasting time is significantly longer than traditional methods, taking up to 30 minutes or more.
The extended roasting time allows for even heat distribution throughout the beans, resulting in uniform roasting.

  1. Unique flavor profile:

Coffee roasted using the pyrolysis method has a unique flavor profile due to the low temperature and long roasting time.
It has a smoother and sweeter taste compared to traditionally roasted coffee, with reduced acidity.

  1. Advantages:

Reduced smoke emission: Environmental pollution reduction and worker health protection
Decreased bitterness and acidity: Smooth and sweet flavor
Enhanced fruit and floral notes: Aroma improvement
Uniform roasting: Improved bean quality

  1. Disadvantages:

Long roasting time: Decreased production efficiency
High initial investment cost: Equipment and technology development required
Skilled labor required: Importance of roasting process management
Types of Pyrolysis Roasting Methods:

Steam pyrolysis roasting: Uses steam to heat the beans.
Indirect pyrolysis roasting: Uses a heat transfer medium to heat the beans.
Vacuum pyrolysis roasting: Heats the beans in a vacuum state.
Suitable Subjects for Pyrolysis Roasting:

Coffee lovers who prefer a smooth and sweet flavor
Roasters who want to develop unique coffees
Businesses that want an environmentally friendly roasting method
Pyrolysis roasting is still a technology in its early stages, but it shows potential as a new approach to coffee roasting. It is expected to develop and become more widespread with technological advancements.

Additional Information:

Pyrolysis roasting technology: https://www.sciencedirect.com/topics/earth-and-planetary-sciences/roasting
Pyrolysis roasted coffee: https://library.sweetmarias.com/glossary/pyrolysis/

What should we consider when roasting coffee beans?

The key points to consider when roasting coffee beans are as follows:

  1. Temperature Control: Precise temperature control during the roasting process is crucial. Heating the beans to a specific temperature range, typically between 190°C to 230°C, helps remove moisture from the green coffee beans and initiates complex chemical reactions inside the beans.
  2. Roasting Time: Roasting time is also a critical factor. Longer roasting times result in darker beans and a more developed flavor profile. Adjusting the roasting time allows you to achieve the desired roast level.
  3. Roasting Profile: Roasters create a roasting profile by adjusting temperature and time to represent the roasting process graphically. This profile is used to achieve specific flavor profiles.
  4. Bean Varieties and Size: The size and density of coffee beans can impact the roasting process. Smaller beans may roast faster, while larger beans may require more time. Roasters take these factors into account when adjusting roasting times.
  5. Roaster’s Expertise and Technique: The roaster’s experience and skill play a significant role. Experienced roasters understand the characteristics of different beans and can adjust the roasting process accordingly to achieve desired flavors and aromas.
  6. Bean Freshness: Freshness is a crucial factor. Using fresh and high-quality green coffee beans can enhance the overall flavor and aroma of the coffee.

Since many factors influence the final quality of coffee beans, roasters must carefully balance these elements to produce coffee with the desired flavor and aroma for their customers.

Web based UI

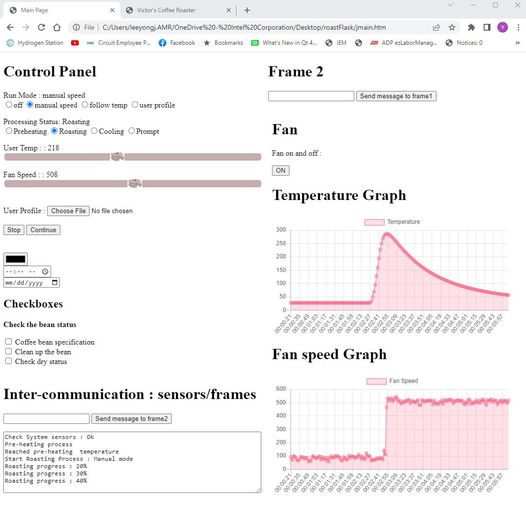
I’m making a UI for hardware control functions using HTML, but it feels too simplistic to be considered a full-fledged program, which is causing some confusion about its nature. We’re developing a web-based feature that provides comprehensive control over RoastFlask while keeping it lightweight, allowing for monitoring of the entire roasting process.

The basic architecture involves setting up a web server on an ESP8266 microcontroller, monitoring the values of each sensor, and automatically adjusting the roasting processor options, various functions, temperature, and fan speed based on the monitored sensor values.

The hardware is tightly integrated with the web, enabling future firmware updates through Over-The-Air (OTA) functionality via the web.

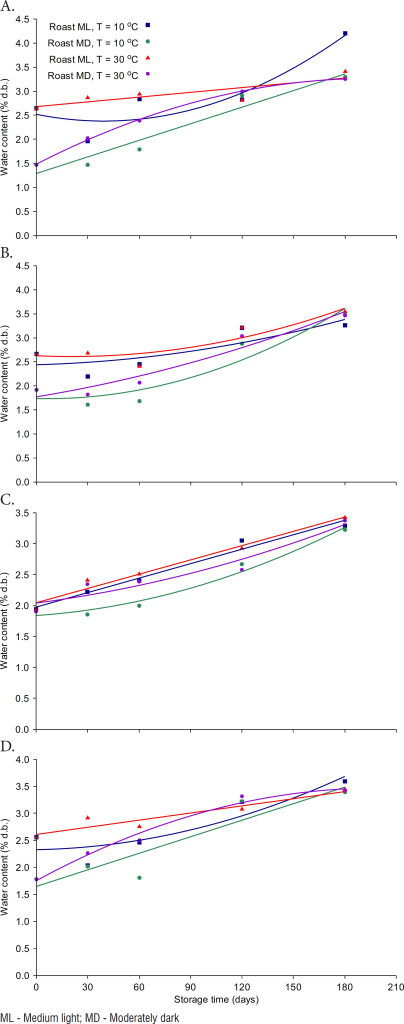
Moisture content of coffee beans during roasting

The appropriate moisture content of coffee beans during roasting varies depending on the type of coffee beans, and it is generally recommended to maintain the level of 9% to 12%.

If the moisture content is less than 9%, the coffee beans may be too dry to roast, and they may lack flavor. On the other hand, if the moisture content exceeds 12%, there is a possibility of improper roasting, and the risk of deterioration increases during storage.

Therefore, it is necessary to measure the moisture content of coffee beans before roasting to determine the appropriate level, and to proceed with roasting considering this during roasting. It is important to maintain proper storage conditions to maintain the moisture content of coffee beans after roasting.

There are several methods for determining the moisture content of coffee beans, but the most common is the oven drying method. The oven drying method is performed in the following sequence.

  • First, grind the coffee beans to the appropriate size.
  • Dry in an oven at a low temperature of 105℃~110℃.
  • After a period of time (eg 15 minutes), reweigh the beans.
  • Calculate the moisture content by comparing it to the weight previously measured.

This method is relatively simple and gives accurate results, and is commonly used in many laboratories and roasteries. However, other measurement methods include the Karl Fischer method and the thermogravimetric method. These methods guarantee higher accuracy than oven drying methods, but can be more complex and costly.

Image source : paper –https://www.scielo.br/j/rbeaa/a/5Mq6qBqfDBZ5DqYBx3nkXTb/?lang=en#

If the moisture content of coffee beans exceeds 12%, a roaster can respond in the following ways:

  1. Adjust the roasting time: Coffee with high moisture content may generate impurities at high temperatures, so adjusting the roasting time can help remove moisture from inside the coffee beans.
  2. Lower the roasting temperature: Lowering the roasting temperature can prevent excessive evaporation of moisture from inside the coffee beans.
  3. Stir more frequently: More frequent stirring during the roasting process can help distribute heat evenly and remove moisture uniformly.
  4. Choose green coffee: Selecting green coffee beans with lower moisture content is also an option before roasting.

Therefore, even if the moisture content of coffee beans exceeds 12%, a roaster can use the methods described above to maintain the quality of the coffee and ensure optimal taste and aroma.

When the moisture content of coffee beans is less than 9%, it is important to adjust the roasting time to be shorter than usual and keep the roasting temperature relatively low to prevent the beans from becoming excessively dry. Low moisture content causes coffee beans to dry out quickly during the roasting process, so it is important to adjust the roasting time and temperature to prevent the beans from becoming excessively dry.

How to measure the moisture content of beans in the system, how to apply the moisture content factor to the roasting profile, and how to set the operating direction of the machine are points to consider. do you have any clues about compensation ways at the roasting stage except mentioned?

Taste distribution of coffee roasting profiles

We’re still thinking about ways to make it easier for even beginners to understand and give input to the roaster when it comes to the results of roasting with a certain profile. One way we’ve found to help is by using a spider web chart to visualize the distribution of flavors. These charts are great for quickly comparing multiple variables at once. Each variable is represented by a different axis, and the dots on the chart have values that correspond to each axis. This helps you quickly see the relationship between each variable and characterize your coffee roasting profile.

However, it’s important to keep in mind that spider web charts only show correlations between variables and not their importance. They can also be pretty complex, so it’s a good idea to collapse the variables before graphing them.

So, while spider web charts are useful, it’s better to use them in combination with other graphs to understand the data better. Some other types of graphs that you could use include histograms, line charts, box plots, and scatter plots. These can help you understand things like the distribution of variables or correlations between variables.

  • Histogram : A histogram is a method of displaying the frequency of a variable as a bar graph. Coffee roasting profiles are useful for determining the distribution of variables such as roast time or color of coffee beans.
  • Line Chart : A line chart is a graph that shows changes over time. The coffee roasting profile can show the temperature or humidity of coffee beans according to the roasting time.
  • Box Plot: A box plot is a graph that represents the distribution of data as boxes and lines. In the coffee roasting profile, you can show the distribution of each variable and check if there are any outliers.
  • Scatter Plot : A scatterplot is a graph that shows the correlation between two variables. Coffee roasting profiles are useful for understanding the relationship between roast time and variables such as the color of the coffee beans.

When you use all of these graphs together, you can get a much better sense of the taste distribution of coffee roasting profiles and the overall nature of the data.

I’m still thinking about how to approach maximal information delivery while simplifying the user UI. Got any cool ideas?

Images source :https://www.coffeeenterprises.com/2011/11/coffee-spider-graphs-explained/

Glass Heating Chamber

Glass, glass, glass…

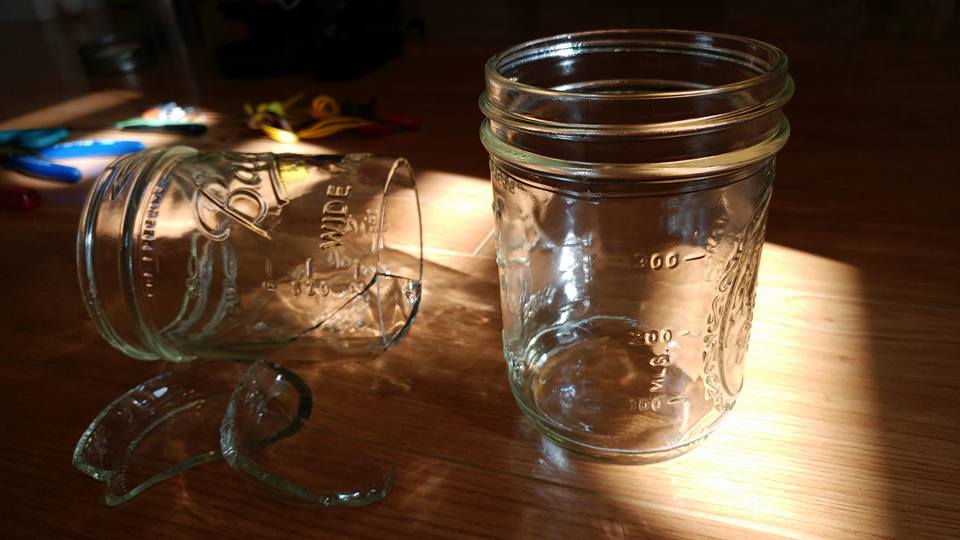
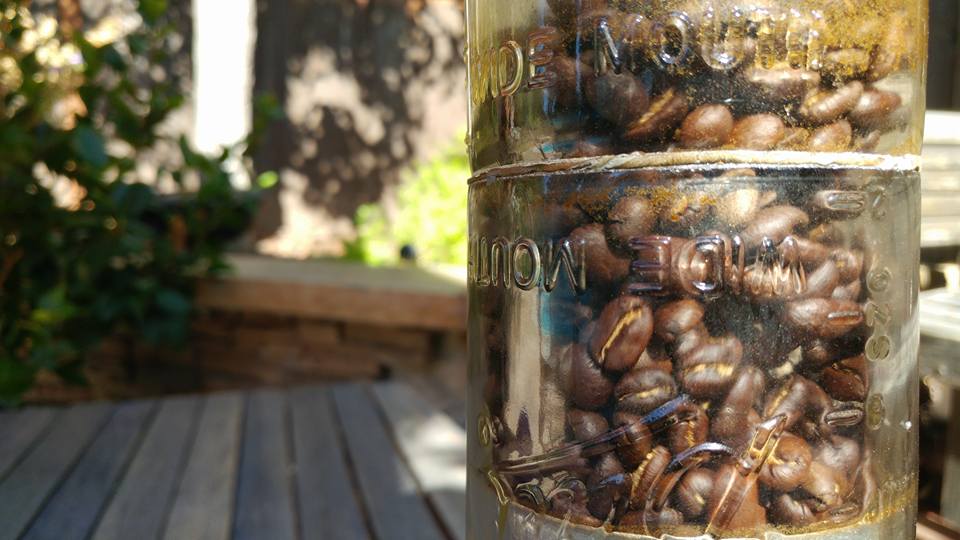
The main roasting chamber has been made of glass since it was first built 10 years ago. The reason for this is that environmental hormones are not released at high temperatures. Therefore, it can avoid the problem of mixing harmful substances during roasting. Additionally, it is easy to clean and durable if no special impact is applied, making it suitable for permanent use. Despite these advantages, the biggest reason for using glass is that it allows easy monitoring of the roasting progress. While the roasting situation can be monitored programmatically through temperature and humidity sensors and sound frequency analysis, visual observation is very intuitively useful for checking the progress. Moreover, it stimulates emotions when an individual operates it at home.

Considering the materials for sustainable environments

Roastflask is made from environmentally friendly materials, making it a sustainable choice for coffee enthusiasts who care about the environment. Its durability and reliability make it an ideal choice for anyone who desires a smooth and rich cup of coffee without the hassle of traditional roasting processes.

The main roasting chamber is made of glasses and the outside skin will be made from ceramic or recycled coffee grounds. but it is not decided detail specifications yet.

But here are good example products which is made from coffee husk.

https://www.fastcompany.com/90604018/now-your-coffee-habit-can-help-build-houses

https://www.sciencedirect.com/science/article/pii/B9780124095175000310

https://www.kickstarter.com/projects/1366930566/huskeecup-waste-made-beautiful?ref=discovery&term=Huskee

Images source : Huskee’s kickstarter promotion

Very old history

This is a pretty old story. I started thinking about roasting my own coffee beans about 20 years ago, but it wasn’t until around 10 years ago that I finally took the plunge and built a DIY roaster one weekend. I loved the taste of the coffee I roasted so much that I kept refining the roaster design and ended up making prototypes 2 and 3, which I’ve been using as my personal roaster for the past decade. The third version wasn’t fully automated, but I added some sensors to monitor the roasting process and played around with different profiles to get it just right. And that’s the story leading up to the creation of the roastflask.

I wanted to start this blog to share my experience of developing a completely new and automated version, which is different from the previous version. At this point, I’m facing a lot of practical challenges and making progress, and I think it would be helpful to document and share this journey. I hope that this blog will be a place where I can share my thoughts and insights about the development process, and also connect with others who are interested in this topic.